
Planning Center setup guide
Connect Planning Center to MailStream, step by step.
Written for church admins, not developers. Follow these 8 steps in order and your church will mail a real postcard to every first-time visitor, automatically.
Before you start
Have these ready and the rest goes quickly.
A Planning Center login with access to People
Use an account that is an administrator or manager in Planning Center People. You will use it once to approve the connection.
Mailing addresses in Planning Center
Each person needs a street, city, state, and ZIP on their profile. People without an address are skipped, never charged.
A credit card for postage
Postcards are paid for with Print Points, which you buy ahead of time. No contract, no minimum.
About 35 minutes
Most of it is one-time setup. After that, cards mail on their own.
Six words you will see
- List
- A saved search in Planning Center People, like "everyone who visited for the first time this week." Planning Center keeps it up to date for you.
- Automation
- A rule in MailStream: "when someone joins this List, mail them this postcard."
- Print Points
- Prepaid credit in MailStream. Each postcard uses points when it is created. Postage is included.
- Cooldown
- How many days must pass before the same person can get the same card again. It prevents double sends.
- Send log
- The history on the MailStream Planning Center page. It shows every card that was sent or skipped, and why.
- Note
- A short entry MailStream adds to the person’s Planning Center profile after each card, so your staff can see it was mailed.
- 1In MailStream3 min
Create your MailStream account
MailStream is where your postcards are designed, paid for, and printed. Every plan includes the Planning Center integration, including the free plan.
- aGo to my.mailstream.app/onboarding and sign up with your church email address.
- bFollow the short setup prompts until you reach the MailStream Dashboard.
- cLook at the menu on the left side of the screen. You will use Artworks, Billing, and Integrations in the next steps.
You’ll know it worked when
You are signed in and can see the MailStream Dashboard with a menu on the left.Watch out
Only a MailStream admin can connect Planning Center. If a coworker already created your church’s MailStream account, ask them to invite you under Settings → Members with the admin role, instead of creating a second account. - a
- 2In MailStream2 min
Add Print Points
Print Points pay for each postcard, postage included. Buying a small amount now lets you send a test card in step 7.
- aIn the left menu, click Billing, then Print Points.
- bChoose an amount and pay by card. You can start small and add more any time.
You’ll know it worked when
Your Print Points balance shows in the bottom-left corner of MailStream.Tip
If you ever run out, MailStream does not mail the card and does not charge you. The send log shows Skipped (insufficient print points) so you know to top up. - a
- 3In MailStream10 min
Add your postcard design
Every automation needs a front design. A back design is optional. If you skip it, MailStream prints the address side for you.
- aIn the left menu, click Artworks, then Postcards.
- bClick New Artwork. Choose Designer Tool to design in your browser, or Upload File if you already have a design (for example, from Canva).
- cGive it a clear Artwork Name such as “Thanks for visiting – front” and pick an Artwork Size. 4x6 is the most common postcard.
- dSave it. If you also want a custom back, repeat these steps and switch on Back Artwork. Use the same size as your front.
You’ll know it worked when
Your design appears in the Postcards list under Artworks.Tip
Not a designer? Our five ready-made church postcards (We Miss You, Thanks for Visiting, Happy Birthday, Thank You for Giving, Holiday Invitation) are on the Planning Center page. Ask us and we will help you set one up with your church name. - a
- 4MailStream + Planning Center2 min
Connect Planning Center
This links the two systems. You approve it inside Planning Center, so you never type or share your Planning Center password with MailStream.
- aIn MailStream, click Integrations in the left menu, then the Planning Center tab at the top.
- bClick the green Connect Planning Center button.
- cPlanning Center opens. Sign in if it asks, then approve the request. MailStream only asks for access to People.
- dPlanning Center sends you back to MailStream on its own.
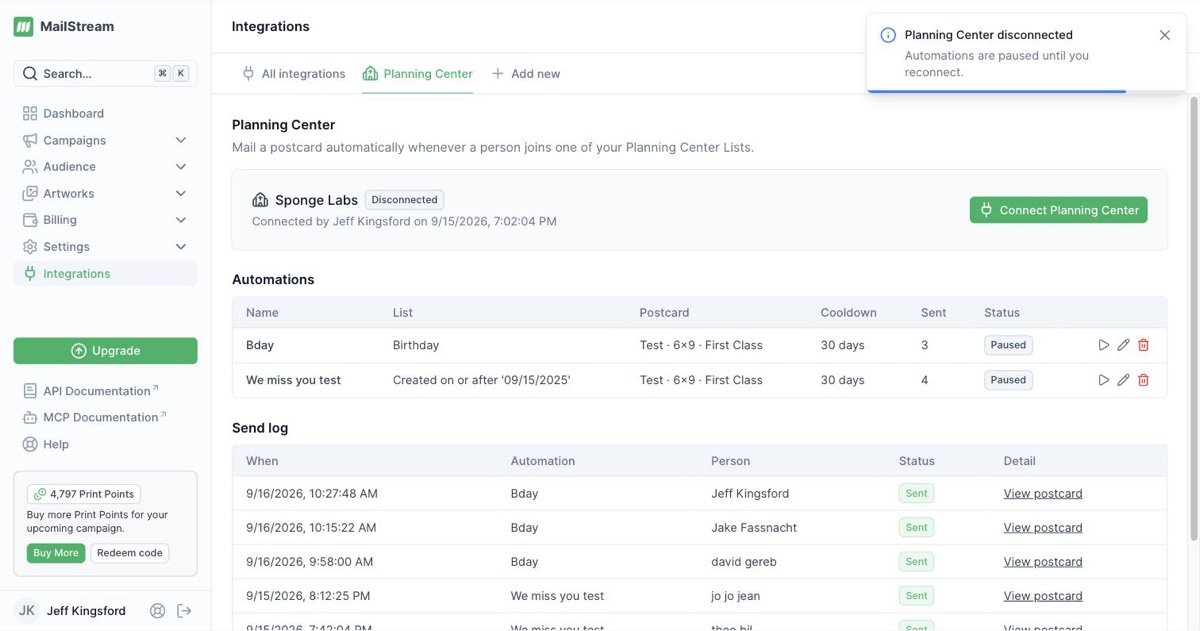
Integrations → Planning Center. The Connect Planning Center button is at the top right. You’ll know it worked when
You see a Planning Center connected message, your church’s name with a green Connected badge, and “Connected by [your name] on [today’s date].”Watch out
Button greyed out with “Only admins can connect”? Your MailStream user is not an admin. See the note in step 1. - a
- 5In Planning Center5 min
Build a People List in Planning Center
The List decides who gets a card. We will build a simple one to start: everyone who checked in for the first time in the last 7 days. Anyone new who lands on this List gets your postcard.
- aIn Planning Center, open the People app and click the Lists tab at the top, then New list.
- bName it Mailstream: First-time visitor. Starting the name with “Mailstream:” tells your team a postcard is attached.
- cClick Add condition and set it to Check-Ins → Attendance → first attended → any event → any location → since 7 days ago. Check Guests and Regulars, leave Volunteers unchecked, and click Save.
- dOpen the List’s Settings tab. Switch on Enable auto-refresh and change Frequency to Nightly. It starts on Monthly, which is too slow.
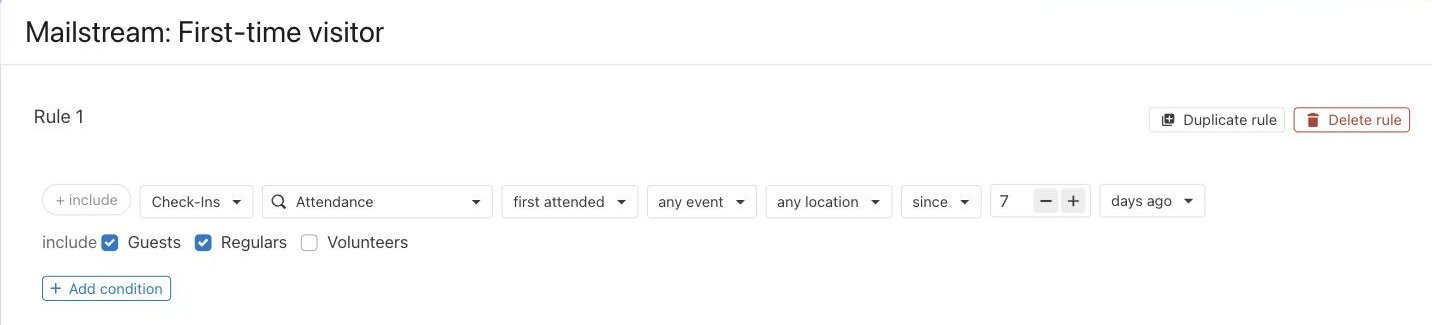
The finished condition for first-time visitors. 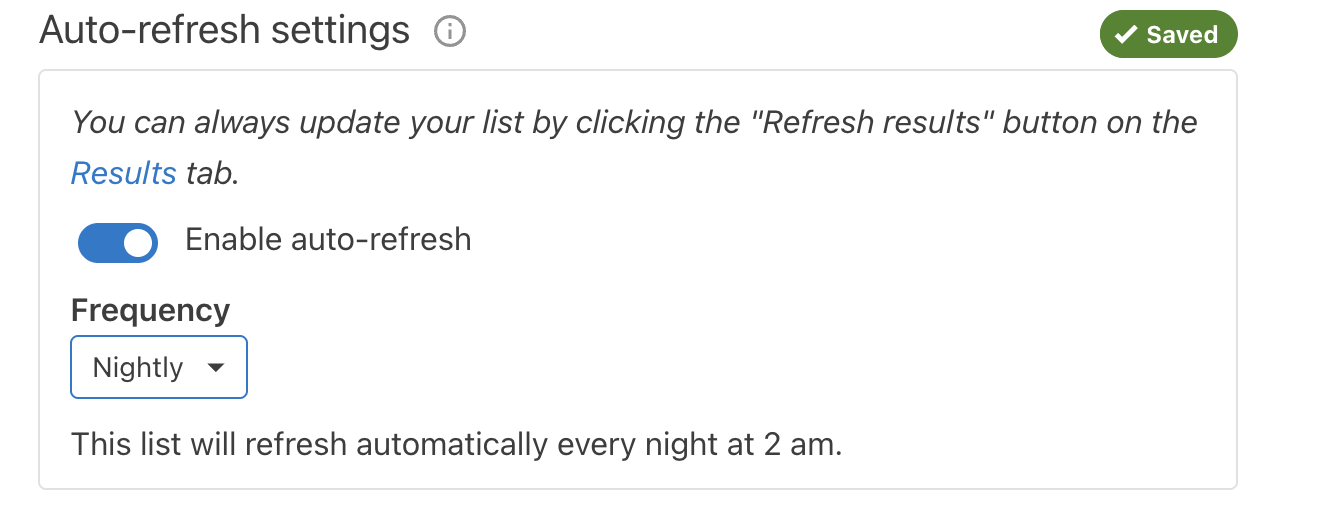
List Settings: auto-refresh on, Nightly. You’ll know it worked when
The List is saved and its Settings tab shows auto-refresh on, Nightly.Tip
Want birthdays, first-time givers, or students who stopped coming? We built and tested those Lists too. Copy them from the List recipes. - a
- 6In MailStream5 min
Create your automation
Now tell MailStream which List to watch and which postcard to mail. The form has three numbered sections.
- aIn MailStream, go to Integrations → Planning Center and click New automation.
- b1. When someone joins a List. Type an Automation name like “Thanks for visiting.” Your team sees this name in the send log and on each profile. Then choose your List under Planning Center List. The number in parentheses is how many people are on it today.
- c2. Mail this postcard. Click your front design in the library. For a custom back, click the Back designs tab and pick one, or leave it as Address side only.
- d3. Mailing options. Size fills in from your front. Leave Postage on First Class. Set Cooldown to 90 days for a visitor card. Leave Write a Note on the profile and Active switched on.
- eClick Create automation at the bottom right.
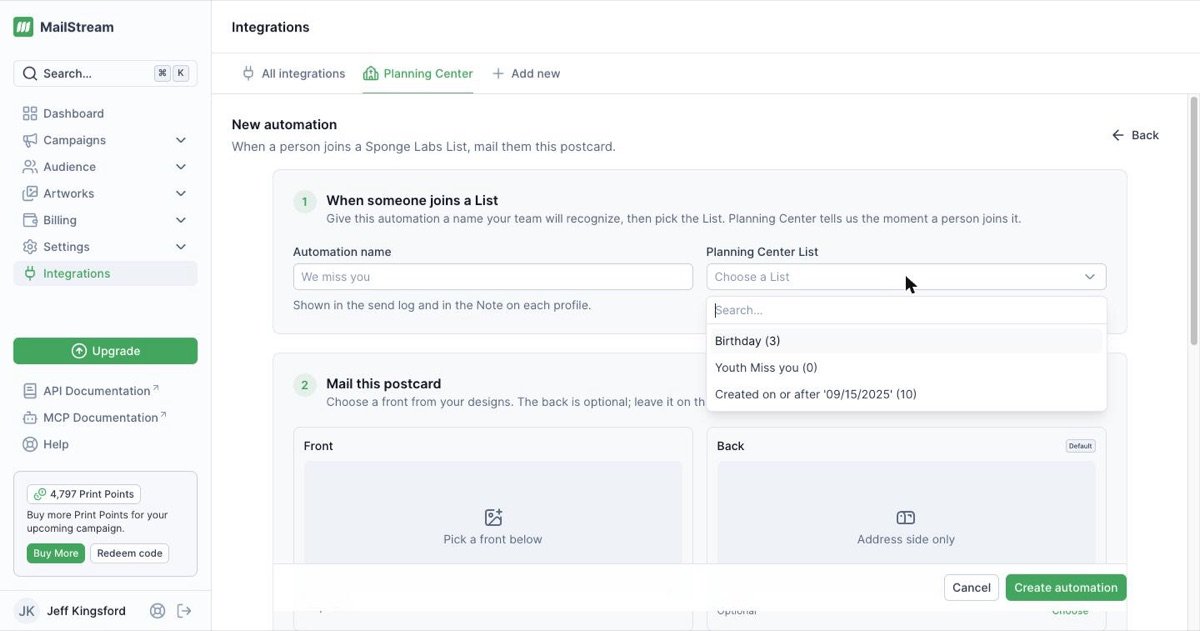
New automation. Pick your List from the dropdown; the number is how many people are on it now. You’ll know it worked when
Your automation is listed under Automations with a green Active badge.Watch out
People already on the List when you click Create automation do not get a card. Only people who join from now on do. This keeps you from accidentally mailing your whole List on day one. - a
- 7MailStream + Planning Center5 min
Send yourself a test card
Because only new List members trigger a card, the easiest test is a small List that starts empty and then matches you. This mails one real card to you and uses Print Points for one postcard.
- aIn Planning Center, make sure your own profile has your mailing address.
- bCreate a new List named Mailstream: Test. Add one condition on your email (type “email” in the condition search box), set it to an address nobody has, like test@example.com, and save. The List should show 0 people.
- cIn MailStream, create a second automation named “Test” that uses the Mailstream: Test List and your postcard.
- dBack in Planning Center, edit the test List’s condition to your real email address, save, and refresh the List. You just joined it.
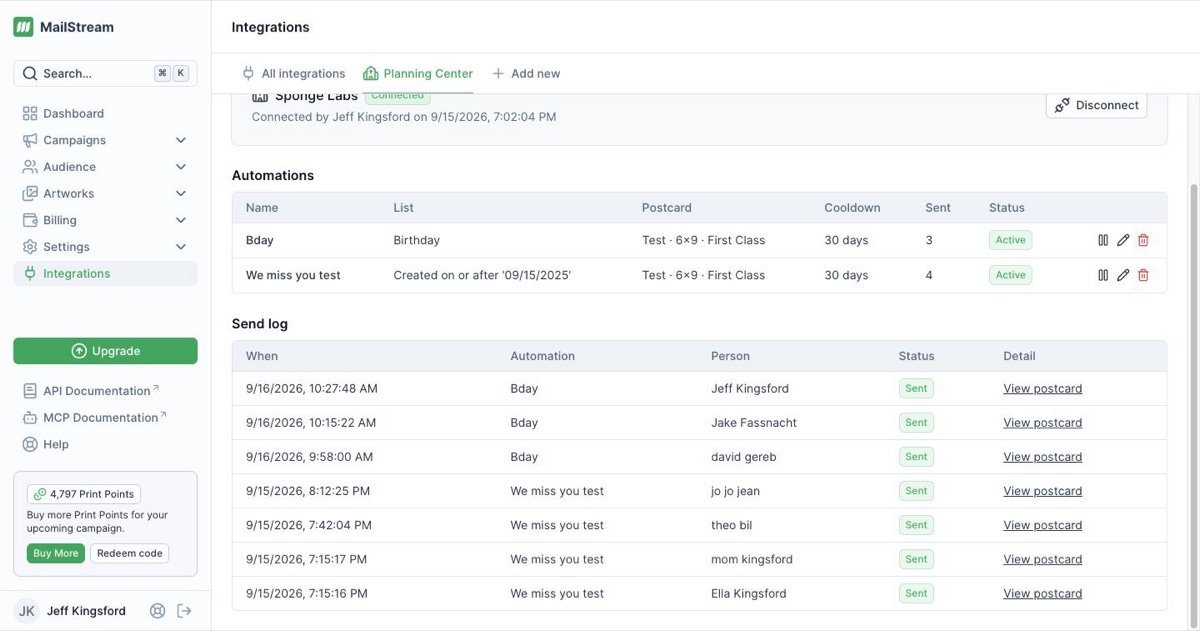
The send log after a few sends. Each row links to the postcard that was created. 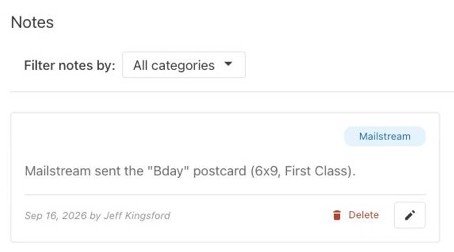
The Note MailStream adds to the person’s Planning Center profile. You’ll know it worked when
Usually within a few minutes, the MailStream Send log shows your name with a green Sent badge and a View postcard link. In Planning Center, your profile’s Notes tab shows a Mailstream note like “Mailstream sent the ‘Test’ postcard (4x6, First Class).” The printed card arrives in your mailbox a few days later.Tip
When the test works, pause or delete the Test automation with the buttons at the end of its row. Your real automation keeps running. - a
- 8In MailStream1 min
Let it run
You are done. Planning Center refreshes your List every night, and each new person gets your postcard the next day. There is nothing to export or upload.
- aCheck the Send log on the Planning Center page once a week to see who was mailed.
- bTo stop a card for a while, click the pause button on its row. The setup is kept. Click play to turn it back on.
- cTo add another card, such as birthdays, build a new List (step 5) and a new automation (step 6).
You’ll know it worked when
New people on your List show up in the send log as Sent. - a
Troubleshooting
If something looks off.
Find the message you see in MailStream, then follow the fix.
| What you see | What it means | What to do |
|---|---|---|
| Skipped (no address) | The person has no complete mailing address in Planning Center. | Fix: Add a street, city, state, and ZIP to their profile. They get a card the next time they join a connected List. |
| Skipped (insufficient print points) | Your balance could not cover the card. Nothing was charged. | Fix: Buy more under Billing → Print Points. |
| Skipped (cooldown) | This person already got this card within the cooldown you set. This is working as intended. | Fix: Nothing, unless you want a shorter cooldown. Edit the automation to change it. |
| Skipped (integration turned off) | The automation was paused or Planning Center was disconnected. | Fix: Reconnect if needed, then click play on the automation. |
| Needs reconnection (yellow badge) | Planning Center stopped accepting MailStream’s access. | Fix: Click Reconnect and approve again. Your automations resume. |
| “No Lists found. Create a List in Planning Center first.” | Your Planning Center account has no People Lists yet. | Fix: Do step 5, then reload the New automation page. |
| “No front designs yet. Create one under Artworks first.” | MailStream has no postcard front to use. | Fix: Do step 3, then come back to the automation. |
| “4x6 postcards are not available with Standard Class postage.” | The Post Office does not offer Standard Class for 4x6 cards. | Fix: Switch Postage to First Class, or use a 6x9 or 6x11 design. |
| Tested, but no card was sent | You were already on the List before the automation existed, so nothing new joined. | Fix: Follow step 7 exactly: start the test List empty, create the automation, then make the List match you. |
Common questions
- Do I need to be technical to set this up?
- No. Everything happens by clicking through two websites you already use: Planning Center and MailStream. There is no code, no spreadsheet, and no file to upload.
- Will it mail everyone already on my List?
- No. Only people who join the List after you create the automation get a card. People already on it are left alone.
- Can MailStream change our Planning Center data?
- MailStream asks for access to People only. It reads names, birthdates, and mailing addresses for people who join a connected List, and adds a Note to their profile after each card. It does not edit people, addresses, or Lists.
- What does it cost?
- The integration is included on every plan, including Free. You only pay for the postcards you mail, with postage included. See the pricing page for current rates.
- How do I turn it off?
- Pause a single automation with the pause button on its row. To stop everything, click Disconnect on the Planning Center page. All automations pause and keep their settings, so you can reconnect later.